目錄表
nVidia + Linux X Window 雙螢幕(延伸桌面)
常見的雙螢幕使用方式有三種
- dual screen:所有螢幕顯示同樣的內容,也就是 Windows 上稱的「鏡像模式」。
- Separate X screen:個別螢幕使用不同解析度,即為「延伸桌面」。
- TwinView:所有螢幕合成一個大解析度的畫面,空間不足的部份滑鼠移過去時畫面會捲動,有用過 vncviewer 的全螢幕模式瀏覽大解析度桌面的人應該不陌生。
nVidia Driver on Debian
下載最新的 nVidia for Linux 官方驅動程式:http://www.nvidia.com/object/unix.html
會有一個 NVIDIA-Linux-*-pkg1.run 檔案。接著在 cosole 中直接執行:
sh [path_to]/NVIDIA-Linux-*-pkg1.run
過程會問很多問題,沒特殊需求的話一直下一步或 YES 就可以了。
裝好後 /etc/X11/xorg.conf 檔案中應該會有類似的設定值:
Section "Device"
  ...
  Driver         "nvidia"
  ...
EndSection
啟動 X Window 的時候如果有出現 nVidia 的 Logo 就是安裝成功了!
nvidia-setting
成功安裝 nVidia 驅動後,「應用程式」→「系統工具」中應該會有「NVIDIA X Server Settings」,打開後就可以用 GUI 設定顯示的模式(一開始視窗很小,要自己拉大),終於不用自己手動刻 xorg.conf 了!
要設定雙螢幕,主要會用到「X Server Display Configuration」這個標籤裡面的功能,Linux 應該可以正常偵測到所使用的螢幕名稱以及解析度,Layout 上面應該會出現所有已經接上的螢幕,每設定一次就可以按下「Apply」鈕套用設定值,但是不適合需要重新啟動 X Window 才會生效的設定。
先勾選「Enable Xinerama」。參考:http://en.wikipedia.org/wiki/Xinerama
Model 中切換要設定的螢幕,或者在 Layout 上面選擇要設定的螢幕。
Configuration 指螢幕要用哪種運作模式,Disable 是不使用,Separate X screen 及 TwinView 一開始有提到。
Resolution 是設定各個螢幕的解析度,如果 Auto 的結果不是想要的,可以自己改。
「Advanced…」 按鈕點開後還有一些進階設定值可以改。
「X Screen」標籤內可以設定 Color Depth(現在的螢幕應該都支援 Depth 24 以上)以及螢幕的位置,這部份可以直接拉上面的 Layout 的螢幕,直接拉成想要的位置。Screen Number 是螢幕代號,在 GDM 登入畫面,輸入帳號密碼的對話框會出現在編號 0 的螢幕。如果要修改編號,要先把其他螢幕 Disable 掉,然後再依序啟用,不能直接改編號。
匯出 xorg.conf
最後按「Save to X Configuration File」匯出設定檔,如果不是使用 super user 執行 nvidia-settings 的話,會無法直接把設定值寫入 /etc/X11/xorg.conf,可以先在別的地方(如桌面)存好設定檔,再 sudo 搬過去。
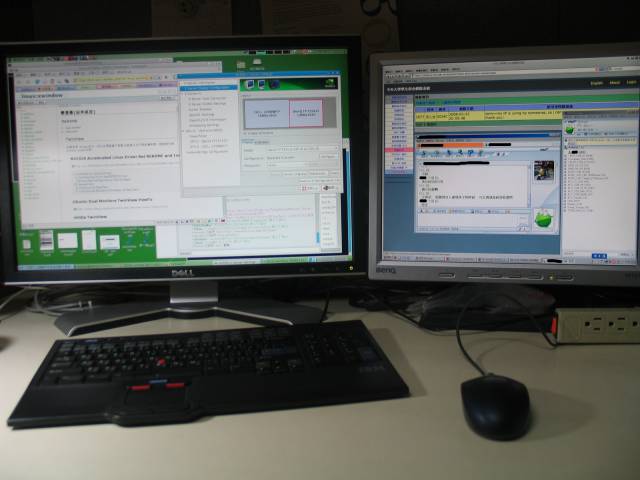
重新啟動 X Window 應該就可以看到新的設定了!左邊放 Gnome,右邊放 VMware Player 下的 Windows。![]()

xorg.conf
參考用,直接抄去用應該是不會 work。畢竟是程式產生的設定檔,有些地方可以更簡潔。而且我找不到他把解析度寫哪去了…
Section "ServerLayout"
    Identifier     "Layout0"
    Screen      0  "Screen0" 0 0
    Screen      1  "Screen1" 1680 26
    InputDevice    "Keyboard0" "CoreKeyboard"
    InputDevice    "Mouse0" "CorePointer"
EndSection

Section "ServerFlags"
    Option         "Xinerama" "1"
EndSection

Section "Monitor"
    # HorizSync source: edid, VertRefresh source: edid
    Identifier     "Monitor0"
    VendorName     "Unknown"
    ModelName      "DELL 2208WFP"
    HorizSync       30.0 - 83.0
    VertRefresh     56.0 - 76.0
    Option         "DPMS"
EndSection

Section "Monitor"
    Identifier     "Monitor1"
    VendorName     "Unknown"
    ModelName      "BenQ FP737s-D"
    HorizSync       31.0 - 83.0
    VertRefresh     56.0 - 76.0
EndSection

Section "Device"
    Identifier     "Videocard0"
    Option         "NoLogo" "True"
    Driver         "nvidia"
    VendorName     "NVIDIA Corporation"
    BoardName      "GeForce 6600"
    BusID          "PCI:1:0:0"
    Screen          0
EndSection

Section "Device"
    Identifier     "Videocard1"
    Driver         "nvidia"
    VendorName     "NVIDIA Corporation"
    BoardName      "GeForce 6600"
    BusID          "PCI:1:0:0"
    Screen          1
EndSection

Section "Screen"
    Identifier     "Screen0"
    Device         "Videocard0"
    Monitor        "Monitor0"
    DefaultDepth    24
    Option         "TwinView" "0"
    Option         "TwinViewXineramaInfoOrder" "DFP-0"
    Option         "metamodes" "DFP: nvidia-auto-select +0+0"
    SubSection     "Display"
        Depth       24
    EndSubSection
EndSection

Section "Screen"
    Identifier     "Screen1"
    Device         "Videocard1"
    Monitor        "Monitor1"
    DefaultDepth    24
    Option         "TwinView" "0"
    Option         "TwinViewXineramaInfoOrder" "CRT-0"
    Option         "metamodes" "CRT: nvidia-auto-select +0+0"
EndSection
Rotating the screen in Xorg/Nvidia
http://nkour.wordpress.com/2006/12/13/rotating-the-screen-in-xorgnvidia/
cat /etc/X11/xorg.conf | grep Rand -B 5 -A 5

Section "Device"
Identifier "nvidia"
Driver "nvidia"
Option "NoLogo" "true" # AVOID LOGO [nvidia == idiots on this one]
Option "DPMS" "true" # well, good to have.. google it
Option "RandRRotation" "true" # for rotate to work
!EndSection

restart Xorg, then do:

xrandr -o left
參考資料
Envy
http://albertomilone.com/nvidia_scripts1.html
如果是用 Ubuntu 的人可以用用看 Envy 這個程式,先下載包好的程式,用 dpkg -i 安裝好後,Debian 把套件庫的 contrib 打開,然後使用 apt-get 或 aptitude 把相依性補齊,「應用程式」→「系統工具」中應該會有「Envy」,開啟後就可以自動幫你安裝 nVidia 或 ATI 顯示卡的驅動程式了!
但是我執行的時候他出現:
Envy - Version 0.9.10
ENVY ERROR: Your Operating System does not seem to be supported by Envy
看起來這套件比較喜歡 Ubuntu,對於新版的 Debian(我目前用 testing)就不支援了……
Microsoft Windows 的雙螢幕
其他人
http://julian14632.wordpress.com/2007/12/30/
裡面提到的 TwinView 和 Seperate X screen 跟我測試的結果不一樣,我的 Seperate X screen 視窗是可以在兩個螢幕間移動的,我印象中也是不行,但是測試的結果竟然可以,應該是 Xinerama 的效果吧!
過時的資料
曾經是用很複雜的方式慢慢刻設定檔…
NVIDIA Accelerated Linux Driver Set README and Installation Guide
http://us.download.nvidia.com/XFree86/Linux-x86/1.0-9755/README/index.html
I. Installation Instructions
  3. Configuring X for the NVIDIA Driver
    Editing the configuration file by hand
III. Appendices
  G. Configuring TwinView
  P. Configuring Multiple X Screens on One Card
Ubuntu Dual Monitors TwinView HowTo
nVidia TwinView
HOWTO Dual Monitors
HOWTO nVidia TwinView
xorg.conf
MetaModes 為兩個螢幕的解析度,可以有多組設定值。
Option "MetaModes" "<mode name 0>, <mode name 1>; <mode name 2>, <mode name 3>"
Option "MetaModes" "1024x768, 1280x1024"
若後面再接一個小老鼠的桌面解析度「Panning Domain」,當 Panning Domain 大於螢幕解析度時仍可正常顯示,空間不足無法顯示的部份,當滑鼠移動過去時,視窗會跟著移動。
Option "MetaModes" "1024x768 @1024x1024, 1280x1024" # 第一個螢幕的桌面解析度為 1024x1024
Section "Device"
    Option         "NoLogo" "True"
    Identifier     "NVIDIA Corporation NV36.2 [GeForce FX 5700]"
    Driver         "nvidia"
    BusID          "AGP:1:0:0"
    Option         "ConnectedMonitor" "DFP-0, CRT-0"    # 想要使用哪些輸出
    Option         "TwinView" "true"
    Option         "TwinViewXineramaInfoOrder" "DFP-0"    # 以哪個輸出為主(工具列所在)
    Option         "MetaModes" "1024x768 @1024x1024, 1280x1024"
    Option         "TwinViewOrientation" "CRT-0 LeftOf DFP-0"    # 螢幕的相對位置
    Option         "SecondMonitorHorizSync" "28.0 - 64.0"
    Option         "SecondMonitorVertRefresh" "43.0 - 60.0"
EndSection

Section "Screen"
    Identifier     "Default Screen"
    Device         "NVIDIA Corporation NV36.2 [GeForce FX 5700]"
    Monitor        "Generic Monitor"
    DefaultDepth    24
    Option         "UseDisplayDevice" "DFP-0, CRT-0"
    Option         "UseEdidFreqs" "True"
    SubSection     "Display"
        Depth       24
        Modes      "1280x1024"
    EndSubSection
EndSection
Clone Monitor
Section "Device"
Identifier "Generic Video Card"
Driver "nvidia"
Option "UseEdidFreqs" "true"
Option "RenderAccel" "false"
Option "TwinView"
Option "NoTwinViewXineramaInfo" "true"
Option "MetaModes" "1280x1024,1280x1024"
Option "TwinViewOrientation" "Clone"
Option "ConnectedMonitor" "DFP,CRT"
EndSection
IBM X60
外接螢幕或投影機
Section “Device”
Identifier “Intel Corporation 82852/855GM Integrated Graphics Device”
Driver “i810″
Option “MonitorLayout” “CRT,LFP”
Option “Clone” “true”
BusID “PCI:0:2:0″
EndSection
新增字型
將字型檔放在
/usr/share/fonts/turetype
然後執行
# fc-cache -v -f